


I never thought that one day I’d take a hacksaw to a lens, much less that I’d be doing surgery on the Voigtlander Super Wide-Heliar 15mm III! But hey, Voigtlander decided that a built-in lens hood was a fantastic idea to add to their Super Wide-Heliar 15mm f/4.5 version III, and I disagreed. Sometimes, such radical disagreements can only be solved with drastic measures!
After testing the Voigtlander Super Wide-Heliar 15mm f/4.5 III against the Leica Tri-Elmar 16-18-21mm, I liked it so much for my landscape work that I decided to keep it. Next step, I started looking for a way to use my favourite 100mm square filters on it.
If you are interested in more information about square filters, please see my BEST FILTERS FOR LANDSCAPE PHOTOGRAPHY and BEST 100MM FILTER HOLDER FOR LANDSCAPE PHOTOGRAPHY articles for more info on how to find the best filters for your Landscape photography.
After looking everywhere on the net for some ready-made solutions, I had to face the harsh truth: there were none. Thus, I started looking for ways to remove the built-in hood; after some more researching I found a photographer whom, back in 2015, did what I have just done today.
Let’s say that I got inspired, if you can call “inspiration” the urge of taking a hacksaw to a lens! Seriously though, since his results looked pretty good, I decided to give it a try. The Voigtlander Super Wide-Heliar 15mm III is too good a lens for us landscape photographers to be left unfiltered! I simply couldn’t help it: I was a man on a mission, and I wouldn’t stop until I succeeded.
True, it was a bit nerve-wracking to think that I was going to saw pieces off a new lens, worth quite a chunk of cash. To calm myself down, I kept thinking that at least I wasn’t going to hack a Zeiss 15mm f/2.8 worth 5.000 euro! Before telling you how I did it, a serious disclaimer and a bit of advice, if I may. Here it is: Don’t do it unless you know what you are doing.
Or, better, let me at least be clear: taking a hacksaw to a lens will definitely void the lens’ warranty. If you aren’t careful, you’ll risk damaging the lens. More importantly, if you aren’t handy with tools you also risk hurting yourself in the process. Finally, this post is not meant as a suggestion to do something as crazy as I did, and I am in no way suggesting that you should go around the house looking for ways to chop off parts of your lenses. Basically, if you want to give it a try, you are on your own: there is no way I am taking responsibility for that.
With that out of the way, let the fun begin!
Disclaimer: At the time of writing, I am not affiliated with Voigtlander in any way. I am a professional photographer looking for the best equipment for my work, I buy all my gear with my hard-earned cash and I don’t get paid by anyone to write articles for my blog.
What did I use:
– A hacksaw for metal, fine-toothed;
– Two flat files, one coarse, one fine-cut;
– 3 or 4 round felts of the type that goes under chairs, about 3 cm wide;
– Scotch-tape, preferably paper;
– Plastic stretch film, the kind you use in the kitchen;
– Elastic band, one;
– Sand paper, coarse and fine;
– A vacuum cleaner;
– A cleaning brush;
– Metal paint, black (I used satin enamel, for interiors and exteriors);
– A painting brush, flat.
Extra points: a vise, to help keeping the lens steady while filing it. While the procedure can be done without it as well, a vise certainly helps.
THE PROCEDURE | Now, let’s see how I did it:
1. First of all, I needed to make sure that no metal dust or filings would get into the lens’ mechanism, or in contact with the lens’ glass surfaces. To do so, I glued a felt disc to a thin cardboard and taped it inside the filter ring to protect the front element of the lens.
I choose paper scotch-tape because it’s very easy to take off and it leaves no residues. After that, I wrapped the lens in abundant plastic stretch film, using the elastic band to squeeze it tight just above the aperture ring.
2. Once I was reasonably sure that a. no metal dust or filings would get into the lens, and b. the lens’ front element was well protected against possible accidents, I grabbed my hacksaw and set off cutting the built-in lens hood’s four fins.
I took care to leave a couple of millimetres out of each fin, to file them down later precisely and smoothly. During the sawing, I regularly used my vacuum cleaner to clean the filings and metal dust, trying to keep my workspace as clean as possible.
3. Once I cut all four fins off, I put the lens in the vise and started filing down the fins’ remains, starting with the coarse flat file first, followed by the fine-cut one. This actually took much longer than the sawing itself! Again, I vacuum cleaned the lens and my workspace at regular intervals, to keep things as clean as possible.
4. Once I was done with the filing, I used sandpaper to smooth the surface down and get it ready for painting.
5. To paint the lens’ ring I used black paint, obviously; my choice went on satin enamel, suitable for interiors and exteriors, so that the occasional rain wouldn’t do the lens any harm. More, I used paint with built-in primer to save time; I applied two coats of paint at a day interval, and the result seems durable enough. Time will tell.
6. Following my first field test with the lens, I decided to paint black the writings on the inner ring, which reflected on the filters and were visible in my images at very long exposures.
As you can see, the paint job is not fantastic, a brush will not do as good a job as spray paint; however, I didn’t want to risk using spray paint even if the lens was all packed up.
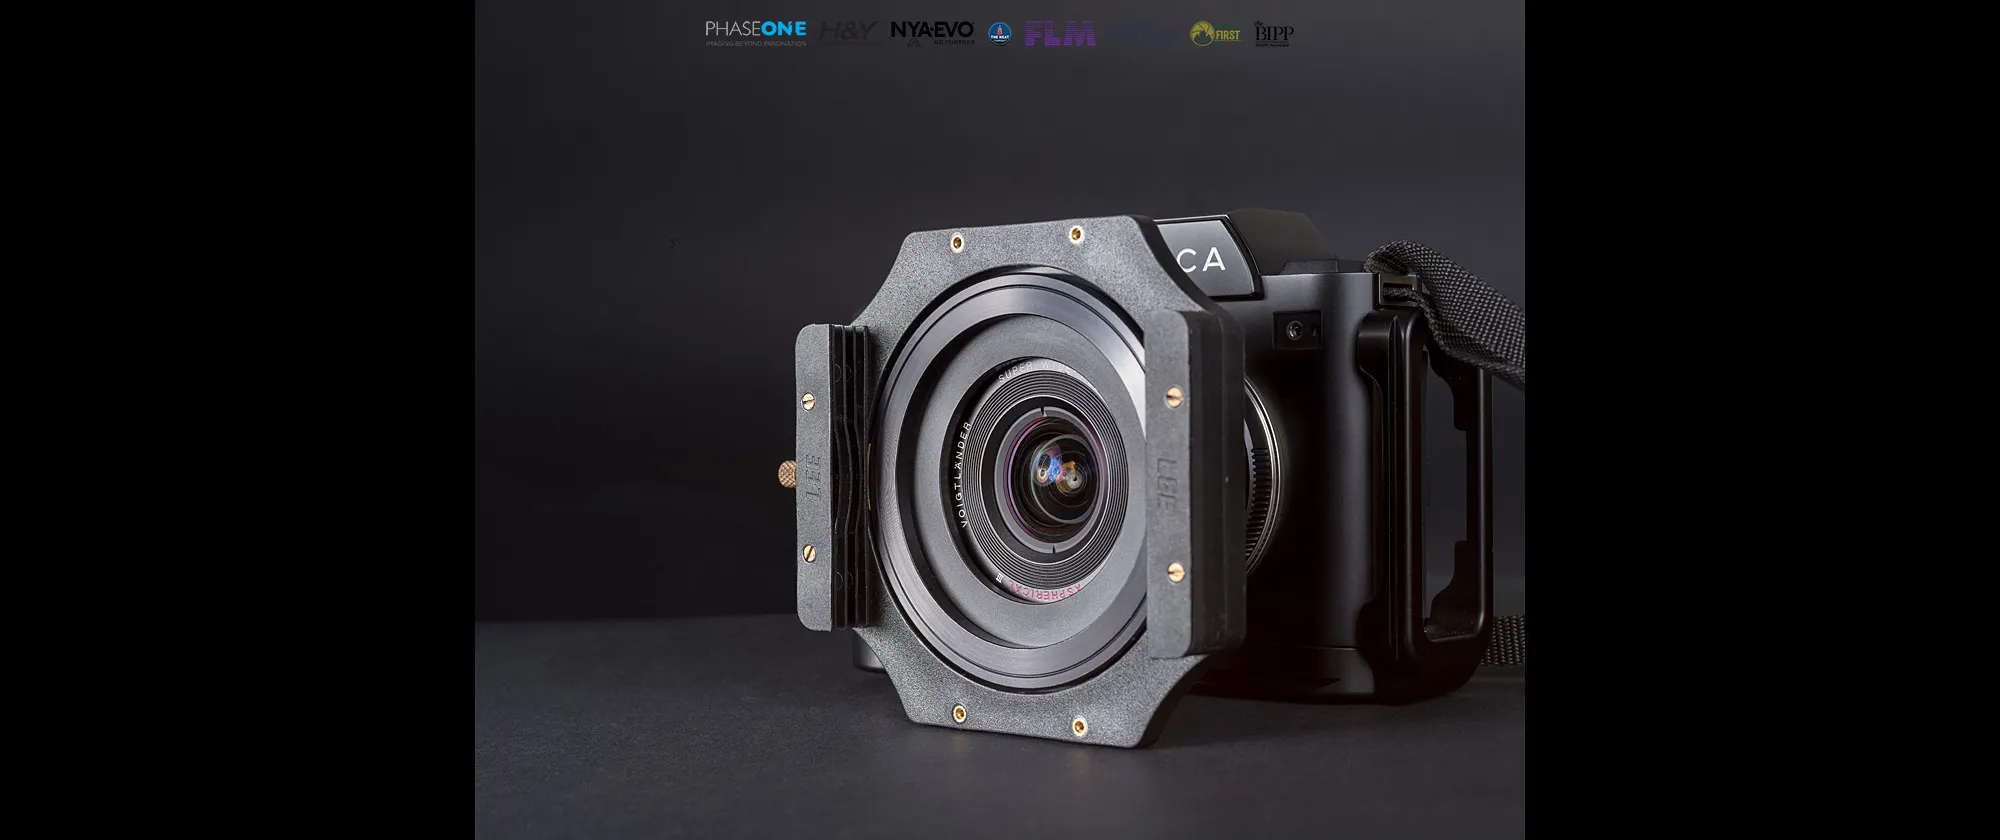
That’s it! The procedure went smoothly, without any problems or accidents, and even though I am obviously biased I think that the results are fantastic. I can finally easily attach my usual 100mm filter adapter to the Voigtlander Super Wide-Heliar 15mm III and use it like any other lens in my bag. Brilliant. Bias aside, this honestly looks like the lens Voigtlander should have produced in the first place. I still haven’t figured out Voigtlander’s rationale to use a built-in lens hood on this lens.
Below you’ll find a visual guide to the procedure (click on the images to enlarge):
Here you’ll find images of the lens after the surgery, together with a couple of ugly shots taken with a 1.5 Grad ND filter on it, angled about 45 degrees just to show that the adapter works just fine and that it doesn’t vignette (click on the images to enlarge):
CONCLUSIONS | I am pretty handy with tools and I always enjoyed doing manual work, model building and the like. So, despite being a bit worried that something could go wrong, I have to admit that besides being pushed by the motivation of using filters on this wonderful little lens I also had a lot of fun in doing the procedure.
That said, I really hope that Voigtlander will soon release a version IV of the Super Wide-Heliar 15mm f/4.5 without the not-so-intelligent built-in hood: we are not all willing to take a hacksaw to our prized lenses! In the meantime, for the brave of heart and sure of hands, it’s good to know that there is a way to use your favourite square filters on the Voigtlander Super Wide-Heliar 15mm f/4.5 III.
If you are curious about where I got my inspiration, click HERE.
Thank you for reading this post, I hope you enjoyed it! Why don’t you share it with your friends, or drop me a comment to let me know your thoughts about this?
9 thoughts on “SURGERY ON THE VOIGTLANDER SUPER WIDE-HELIAR 15MM III”
Hi Vieri. You were so near to being in trouble, instead you are a Hero!!!! I perchased the new Voighlander 15mm V for my Leica SL. LIke you I was disappointed about it having the fins,so I could not fit my Lee Filters. After reading you article, they had to go. I did as you stated, except I used a angle grinder which was mounted in a device that could move up and down. Difficult to explain but l could send you a photo. Once done I fitted a step up ring. Job done. Of to Norfolk UK with big sky’s this week with my new toy. Car’t wait. Many thanks, such a great lens. Yours Phil
Hi Phil,
thank you for your message! I am glad that it all worked out fine in the end for you with the Voigtlander 15mm v. III and the “surgery”, and I am happy to hear that you found a different way to get to the same result (perhaps in a less messy way too!). Enjoy Norfolk and your new lens then! Best regards,
Vieri
Great article Vieri. I am all in! But I have one question about the outcome: taking into account the vignetting—and presumably some cropping?—how does the end result field of view compare between the Voigtlander 15 and Hassy 21?
Hi Vieri. Curious to hear how the lens handles flaring now that the hood is removed. Anything significant changes in that regard? Keen to do the modification for myself, but that is my only reservation. Hoping that the fixed lens hood was just an oversight on Voigtlanders part, and that the lens handles flaring without the hood pretty well. What are your thoughts and findings?
Cheers,
Malin
Hello Malin,
thank you for your message. In my experience, the lens handles flare exactly as it did with the lens hood. I think that, like you said, the hood was just there for show, I don’t think it really did anything other than making it impossible for us to use square filters without doing a little surgery on it :)
Best regards,
Vieri
Dear Vieri,
Congratulations on your thorough description and damage-preventive surgery of that lens. I agree that it is unfortunate that Cosina made the decision of providing this lens with a fixed hood. They should know better!
But considering the good reviews that Urth Plus+ filters are getting now days, the Urth Lens Filter Kit Plus+ (58mm) may be something to consider before getting in all the work you described here. It provides at least UV and CPL, and with ND4, ND64 and ND1000 available in slightly different diameters.
Just a thought.
Hello Dominique,
you are very welcome, happy you found the article interesting. About your suggestion, there are many 58mm round filters on the market that can do the job better than the Urth which, frankly, are not the brand I would recommend – at all. I would also allow your message this once, but kindly do not use the comment section to do blatant brand promotion here, or I will be forced to not approve any further comments.
The reason for the surgery is twofold: on the one hand, to allow for the use of square filters, and therefore Grad NDs, which are impossible to use as round filters; on the other hand, to allow for the use of stacked filters, which is impossible with round filters since they will vignette immediately.
Best regards,
Vieri
Dear Vieri,
I apologize for the comment I made around that product and company. It was not my intent. As I just purchased the 15 mm Ultra-wide Heliar you reviewed so well after and before surgery, I just thought of a way to avoid that surgery you describe above so well. I thought that 58 mm magnetic filters will be an option and I saw some good reviews for those filters of the company I mentioned. I do not own any of their filters yet and I do not think it will ever happen after your assessment.
Thank you for your comment,
Best regards,
Dominique
Dear Dominique,
thank you for your message and no worries, understood – these days and age there are so much bots and spammers that it’s sometimes hard to discern when someone like you makes a comment in good faith, my apologies for the reaction.
If you are looking for 58mm filters, I would recommend the Kase KW magnetic system which works great and offers the best optical quality around together with H&Y (I am not affiliated in any way, I just use it and love it myself); but, as mentioned above, be aware of vignetting if you stack more filters, and of course you won’t be able to use square Grad ND filters in case that is something you’d be interest into.
Hope this helps! Best regards,
Vieri